

Material Requirements Planning in SAP Business One [TUTORIAL]
Material Requirements Planning feature in SAP Business One can be used by small and large organsiations to effectively optimise their inventory.
This is a presentation of SAP Business One – Material Requirements Planning (MRP). The objective is to explain the concept of MRP and how an organisation can use this feature to optimise the inventory. From there we will show the MRP feature within the SAP Business One platform, showing the configuration and workflow to run it successfully within the application.
For more information on the new SAP Business One 9.3 version check the article.
SAP Business One and the Material Requirements Planning feature
TUTORIAL Transcript
Hello, and welcome to this presentation of SAP Business One’s Material Requirements Planning feature. The objective of today’s presentation is to explain the concept of Material Requirements Planning and how an organization can utilize that feature to optimize their inventory. From there, we’ll demonstrate the feature within SAP Business One, showing the configuration and workflow to run it successfully within the application.
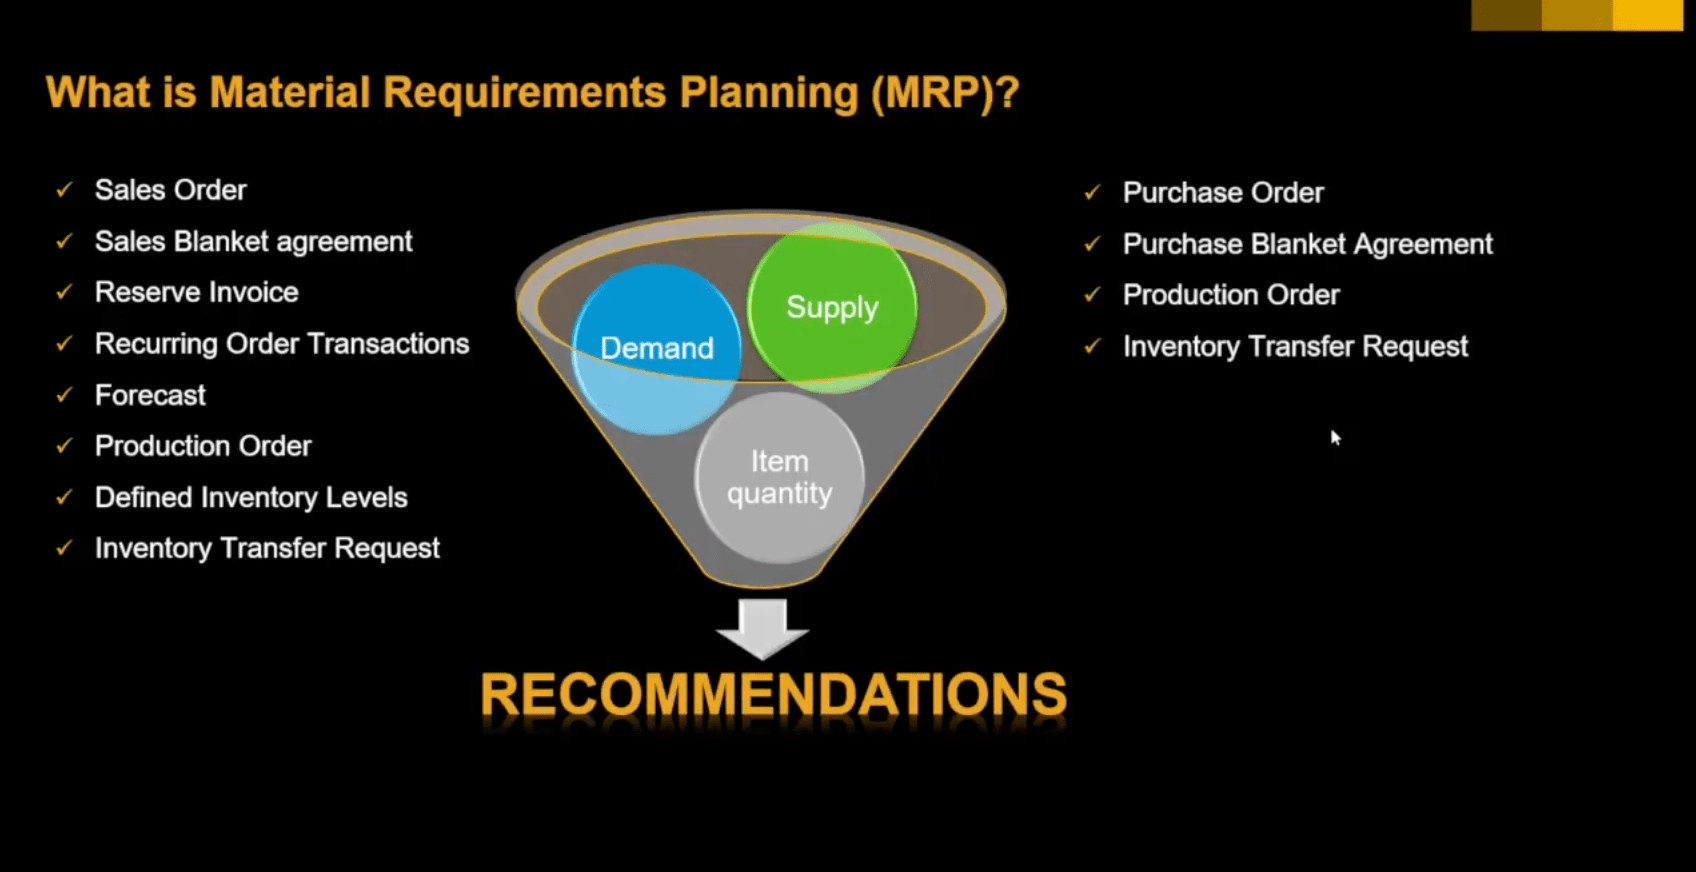
So, what is Material Requirements Planning or, in short, MRP?
Well, MRP is a tool for organizations to effectively manage their inventory. Inventory can be a challenge for an organization, so MRP can assist with this challenge by consolidating all the variables and conditions around inventory into one workflow.
So, when we’re talking about MRP and these variables, it comes down to three factors, which we have in front of us.
- Demand;
- Supply;
- Our existing inventory position – item quantity.
Let’s talk about demand.
Demand is any type of document in the system that puts a commitment on inventory. So, some examples we have here are sales order. So, this is our open sales order that has yet to be delivered, or a forecast that you’ve created in the system that predicts the future demand for the organization, and then we also have things such as inventory levels. So, if you have safety levels or minimum and maximum stock levels, MRP will consider all these as demand on inventory to then produce a recommendation.
The next step is supply. So, these are obviously the entries or the documents that offset that demand that already exists in the system. Now MRP would consider those supplies as part of its calculation, so it won’t over-purchase or overproduce any particular item. So, we have some examples here of purchase orders. Purchase orders that haven’t been delivered yet or production orders that haven’t been completed yet either, and we also have things such as inventory transfer request. If you’re an organization that have multiple warehouses, you can then treat another warehouse as a means of supply, and MRP can bring this all in and then produce these recommendations.
The last factor is item quantity and that is your existing stock position or stock on hand. MRP will look at that and then consider the supply and demand, and then do the calculation and produce, as a result, a recommendation.
Now, what is a recommendation?
Well, a recommendation is either a buy document, which would be a purchase order, a produce document, which will be a production order, or a transfer. So, what we’ll take you through now is all of this in a workflow within SAP Business One, which is a guided workflow to produce MRP results and recommendations.
MRP in SAP Business One – Interface and Guide
So, I’ve moved across to the SAP Business One system so I can demonstrate the MRP feature. What I’m going to do is run through a scenario where a company is purchasing and manufacturing road bikes using the MRP tool. Okay. So, how do I access MRP? From the main menu, I have all the available modules within SAP Business One and we have an option here for MRP. When I expand that, I have three options of Forecast, MRP Wizard, and Order Recommendations, which I’ll run you through. The first one is Forecast. As I explained earlier, it’s a source of demand against MRP.
What I can do to configure a forecast is simply create one and, as I explained, what we’re going to do is one for road bikes. From there, we define the forecast period that we’d like to set this road bikes forecast for and what I’m going to do is the beginning February to the end of April.
So, once I’ve done that, the grid below, the content’s grid, updates with those values and I can go ahead and populate that with the information I need. So, one way is to enter the forecast manually, which I can do by simply going to the item catalogue and selecting an item. I then define the warehouse that I want this forecast for and then I enter the quantities that I need for those periods. That’s one way of doing it.
Another way is to enter it via a spreadsheet. So, if you set up a spreadsheet that mimics or replicates this grid structure, you can do a copy and paste and it will populate the forecast. Another means of generating the forecast is the options down the bottom right here of either a basic forecast or an intelligent forecast. Now, basic forecast allows you to take a period in the past using historical sales to then populate this same grid in a very straightforward method. The alternative and more advanced way is the intelligent forecast, which I’ll take you through.
So, when I open up this, it gives me this option here and this screen here, and then from the top of the screen, I can define which products I want to forecast against. So, I have options to select by item, preferred vendor, or the default warehouse, the item range I would like to define, or by item group, which I want to use. So, I’m going to choose hardware for the items that I’d like and then under properties, on the right-hand side here, I’m going to then choose road bike. From there, I have the option to specify which warehouse I want to generate this forecast for, which I’ll do. So, I tick the box and then I drill into the magnifying glass and choose the warehouse I’d like. I have the Sydney warehouse down the bottom, which I can go ‘okay’.
Then I have the option for sales history. So, which underlying document do I want to generate the sales forecast from? So, I have sales order, delivery, or AR invoice, which are all perfectly fine, but for this one, I will use sales order. Then I can just simply hit forecast and the system will use that information, and the forecast horizon that I’ve defined of February through to March, to generate what we have in front of us right now.
So, the middle of the screen, I can see that grid structure that we saw before of the item, the warehouse, and now we’ve got populate figures of six, nine, and six again. So, this is what the forecast has … well, the intelligent forecast has suggested what our forecast should be for these periods.
Down the bottom, we have the actual sales history in a graphical representation. I can see all the peaks and troughs and all the sales. So, I can go hover over a field and I can see for December 2015, we sold a quantity of 22. If I go to another period, I can do the same thing. Now, the good thing about the intelligent forecast is that it’s an interactive tool. It’s produced the data based on our sales history but then I can interact with that data to make it more in line with what I would expect the system to use to reproduce a forecast.
Now, how do I do that? So, I’ve got the representation of our sales history in this blue line graph, and then I have the forecasted value that the system’s calculated in yellow here. Now, if I see in the sales history a few outliners and they need to be smoothed out, I can simply click on that period, hold, and then drag it to something that I would expect it to be. When I do that, you’ll notice that the forecast count will recalculate based on that adjustment, which is very handy if you have those sort of outliner documents. That you’ve had a big sale of an item at one stage, which wouldn’t be a fair reflection of what the actual sales would typically be.
Now, at the moment, the forecast is using the whole period right up to January 2018 and that might be a good way of determining what the forecast should be for February through to March, and the way that I can adjust this is by using this arrow here and dragging when the start period should be. So, if I wanted this to start at the end of 2016, I can do that. The system will then refresh the forecast, and then I can see the comparison between what the forecasted value of the sales will be against the actual sales. So, this gives me a degree of confidence of how well is this algorithm doing to then predict the forecasted values. I can adjust these values again. So, if I wanted to increase the sale for 2016-06, I can do that and then you’ll notice that the algorithm updates and gives up an updated forecasted data line.
So, I can do that for each item. At the moment, I’m on that first item. I can go to the second item and do the same exercise. Very powerful tool to really give you confidence with the forecasted value that the system’s calculating. Once I’ve completed that exercise, I can go save and close, and what the system will do is take that data and populate the forecast that we had earlier. I can add that to the system, gotta give it a name, and then I go add. So, now that’s in the system and now I can use it as a source of demand for the next step, which is the MRP Wizard, which I’ll go through now.
The Material Resources Planning Wizard (MRP Wizard) in SAP Business One
The MRP Wizard is a step-by-step workflow to get to the recommendations. It will ask me for how long I want to plan for, what warehouses, and what underlying items, and what source documents in a guided workflow, which is very straightforward, which I’ll take you through right now. I’ll go next on the first step. I have the option to select a predetermined scenario that I’ve created in the past. Alternatively, I can create a new one, which I’ll do, and the scenario name will be road bikes. The scenario name would indicate the nature of the scenario that we’ve determined. We’ll go through that now. “Road bikes” is the scenario name, then I define the scenario details, and the first thing is the planning horizon. So, how far into the future would I like the MRP Wizard to run for to then give me recommendations?
What I’m going to do is select from today the 31st of January through to the end of next week, which is February 9th. The next option is to indicate how I’d like the data to be displayed. So, you’ll see that at the end of the MRP Wizard is the MRP results and it will display the data in these period buckets, and I’ll leave that as one day.
The planning horizon is 10 days based on the start and end date that I’ve defined. From there, I can also consider holidays. This will tie into the number of days and other factors such as lead time that I would need to consider as part of MRP. Now, I’ve got options to choose that for production items. So, items that we manufacture and items that we purchase from our suppliers. I’ve also got an option here to ignore cumulative lead time. So, if I produce an item and there’s multi-level bill of materials, I can then choose if it’s a cumulative lead time or if each of them can run in parallel. So, I’m going to choose ignore just for this example.
I have a whole range of display preferences. This is how the final results will be displayed, which I’ll leave it as is. I then go next, and then I choose which items I want to include as part of this MRP Wizard. So, I can either leave it as is, all items that we’ve defined in the system, or I can choose a selected range. To do that, I can go selected items on the left-hand side. I go add items on the right and then I can choose the item group of hardware again, and then I can choose the parameter, or the property, of road bike. We then go okay and then that populates the item selection screen with those road bikes that I’d like as part of the MRP run. I then go next and then I have the inventory sources. So, this is part of the MRP … one of the factors with an MRP. Which warehouses do I want to consider for existing inventory? So, stock on hand. Demand, so existing sales order that we have in the system and also including purchase orders, or supplies that we have in the system.
What I’m going to do is define this just for Sydney. So, I’m just removing the predefined selections and selecting the Sydney warehouse only. On the top of the screen, I have the option to run the MRP Wizard holistically for the whole organization and consolidate the purchase order into one document. Alternatively, I can run it by warehouse. So, for every warehouse, there will be another document raised for each destination warehouse, which we have available here. I’m just going to leave it as Sydney and then I go next, and then we have our document data sources. These are the supply and demand documents that we have in system that I would like to include as part of the calculation that MRP will be running.
The first option is the time range. I’ve got options of within planning horizon, so that was the period that I selected at the beginning and the scenario details of the end of January through to the 9th of February. So, if I only want to include data that falls within that period for the source documents, I can do that. Otherwise, I can also include historical data. Data that precedes the 31st to include into this MRP run. Documents that are earlier than the 31st of January that haven’t been delivered or haven’t been supplied yet, so I can do that as well, which I will choose.
Then underneath that, we have all the supply and demand documents such as purchase request quotes, sales orders, production orders, and these other documents that we have here. And it’s simply a tick box to apply that to the MRP run. I’m just going to leave it as that. I’m going to include purchase orders, blanket agreements, sales orders, and production orders. I’ve also got on the right-hand side the option to remove or restrict the purchase orders or the documents that I want in this MRP run. So, there might be some extraordinary orders that aren’t typical that I would like to exclude as part of this MRP run. I can then set that in this scenario, so we get the right results.
Underneath that, we have our inventory levels. So, this is when we were talking about mins and maxes and safety stock levels and those sort of things. So, if behind each of the items in warehouses we have mins and maxes defined for our safety stock to optimize our inventory level so we’ve got a high level of availability, I can then select one of those. For this example, I’m going to choose a minimum. From there, I can then define the forecast and what we see here is that road bikes forecast that I defined earlier, which I can now include as a source of demand.
From there, we have our recommendation.
Under recommendations, we have the ability to raise either a purchase request or a purchase order as a result of the MRP run. We also have the option to create production orders and also inventory transfer requests. Depending on the conditions of the scenario, the parameters that we’ve defined, you would select the applicable documents that you would want the MRP Wizard to recommend. From there, I can save this scenario. So, once I save that scenario, that’s going to be a templated scenario that I can use time and time again. If every time I want to raise a set of purchase orders and production orders, I can just simply reopen this scenario and run through this same process again without having to feed in too much information.
Everything is ready to then run the MRP Wizard. What the system is going to do is go away and look at all the data sources that I’ve defined and return these MRP results. We’ve got a number of options here. We’ve got a number of values that have been returned. I see all the road bikes that I’ve defined and all the suggested quantities that the system’s again recommending that I release. I have for the Rapid Road Bike a quantity of five that it’s suggesting that I release on the 31st of January. I can find out more information regarding why it’s saying five. What it’s doing here is that it’s got a breakdown of our initial quantities, so we have 10 on hand already for the Sydney warehouse. And then I have this suggested demand document that it’s saying that I need to raise today.
So, if I drill into that, I see that the five is driven by the forecast that I defined in the system earlier. So, that’s why it’s coming through as a recommendation on the MRP results. I can then also look at the supply and this is when it’s expecting the item to arrive based on that supply, based on things such as lead time. I can hover over this item and see what the lead time is. So, it’s three days, and that’s what the system’s using. I raise the purchase order then and then it’ll be supplied on the 5th. I also got other items here indicated in red, and that means that based on the conditions and lead times that we have behind items, we’re not going to meet that demand on the expected due dates.
So, I have this demand of the 11th … demand of 11 on the 1st and, again, it’s the forecast of 11 that the system had calculated for me, and we’ve got the supply coming in on the 6th of February. Now, we can look at that and we see that the lead time is four. So, the system is given us indications where we … based on the configuration of the item, we aren’t going to meet our demand based on the dates that we’ve set up in this system.
We’ve also got other items here that weren’t part of my initial selection criteria and now they’re appearing there because there was a production item that was included as part of the road bikes. So, I see a titanium frame has been included for 16, and if I look at the demand for 16, I see that it’s a MRP requirement on the item IM1007. If I drill through to that, I can see it’s for the Venom Road Bike. The reason why the system is recommending I purchase titanium frames is because of the Venom Road Bike that we have up here, which was part of my selection criteria.
The system is very comprehensive. It not only looks at the initial item that I’ve selected but the underlying dependencies in order to produce that when it’s a production item.
On the second tab, I have the recommendation. So, based on the MRP result, it’s given me a breakdown of the recommendations that it will ask me to then post in the system, which I’ll take you through. I’ve got a purchase request as a recommendation for the Rapid Road Bike. I’ve got a quantity of five. Release it today, which is the 31st, and it’s expecting it to be delivered on the 5th of February from this particular supplier. This has all been pre-set up in system and the system is gathering all this information, consolidating it all into this single report. The MRP recommendations report, and all I have to do is a simple agree or disagree in the final step.
If I agree with these recommendations, I can then save the recommendations and then finish it for the final step, which is the order recommendations. So, when I click on order recommendations, it comes up with a selection criteria screen, which allows me to select the scenario that I would want to produce orders for. Under scenarios, I can see that I’ve got the road bike scenario available, which I can select and then I can go ‘okay’. From there, I see that same report that I saw earlier as part of the MRP results, but this is where I actually create the document that it recommends and I also can fine-tune it if necessary.
I have that Rapid Road Bike for five. If I want to increase it or decrease it, I can. So, I’ll increase it to 10. It’s asking me to update the price based on that, so if I’ve got any special prices and quantity breaks, the system will be recalculate that and then I go ‘okay’. I can do that time and time again for all the other recommended items, but the final step is selecting what underlying documents I’d like to create, which are purchase requests or production orders. So, select those that I wish to create. I then hit update and then behind the scenes, the system is then going away and generating those purchase orders and purchase requests.
So, that was a very clean workflow of the MRP Wizard with the road bike scenario. From creating the forecast using the intelligent forecast tool, to look at historical data to then include it as a source of demand, running through the Wizard, including the planning horizon, the warehouses, which items I’d like to include, which underlying source documents I need for source and demand … or supply and demand, and then reviewing the MRP results, which I can then drill in and understand how the system is determining those values to recommend … to produce orders. And then creating the orders that it recommends it and fine-tuning them if necessary. MRP is a very comprehensive tool to really assess those challenges around inventory, to really optimize your inventory, and make sure that your overall inventory turnover performance is at its best.
For more information on Material Requirements Planning in SAP Business One call 1300 045 046 or email us at info@leveragetech.com.au.


Leave A Comment